CodeProject In Part 1, we covered the following:
- Creating the application* Connecting the View and the View-Model* Adding an additional View or PagePart 2 we'll see how to add a button on the first page to navigate to the second page which will cover navigation and messaging to complete the application and although basic, will give a rather decent start to create and publish your first Rubber Ducky application.
If you need the code, you can get it here.
Let’s start by opening MainPage.xaml. You should see the following image here:
Add a button by dragging it on to the design surface or adding the following code, it doesn’t matter where, just somewhere within the content grid.
<TextBlock Text="{Binding Welcome}"
                       Style="{StaticResource PhoneTextNormalStyle}"
                       HorizontalAlignment="Center"
                       VerticalAlignment="Center"
                       FontSize="40" />

            <Button Content="Button"
                    Height="72" HorizontalAlignment="Left"
                    Margin="154,354,0,0" Name="button1"
                    VerticalAlignment="Top" Width="160" />
Next, lets add the messaging capabilities which will work hand in hand with the navigation from one page to the next. Start by adding a new folder to the solution called “Messages”.
Then add a new class called *NavigateToPageMessage.cs *which contains the following code.
public class NavigateToPageMessage
{
    public NavigateToPageMessage()
    {

    }

    public string PageName { get; set; }
}
Now we have to register the main page of the application to receive the NavigateToPageMessage and do something once it receives it. Open MainPage.xaml and add a new event handler for the Loaded Event. Do this by selecting the **PhoneApplicationPage** in the Document Outline Window, go to the Properties Windows and select the Events Tab and double click the **_Loaded_** event to insert the code.
[](http://lh3.ggpht.com/-i4rq_yd6g1Y/UBqmNhHy0YI/AAAAAAAAAKM/S5bslzGxNRw/s1600-h/image%25255B3%25255D.png)
Open the MainPage.xaml.cs code and find the newly inserted event handler which should look like the following:
private void PhoneApplicationPage_Loaded(object sender, System.Windows.RoutedEventArgs e)
{

}
In order to support messaging from MVVM Light, add the messaging namespace (MvvmLight1.Messages;) to the top of the page. Next, we will add the code to subscribe to the NavigateToPageMessage.
* *
private void PhoneApplicationPage_Loaded(object sender, System.Windows.RoutedEventArgs e)
{
    Messenger.Default.Register<NavigateToPageMessage>
                (
                    this,
                    (action) => ReceiveMessage(action)
                );
}
ReceiveMessage is the delegate that will handle the message object, in this case the NavigateToPageMessage type.
private object ReceiveMessage(NavigateToPageMessage action)
{
    var page = string.Format("/Views/{0}View.xaml", action.PageName);

    if (action.PageName == "Main")
    {
        page = "/MainPage.xaml";
    }

    NavigationService.Navigate(
       new System.Uri(page,
             System.UriKind.Relative));
    return null;
}
What we have done here is handled the property PageName of the action and to the application to navigate to the appropriate page. Pretty simple right? You’ll notice that I put in a special handler here if the PageName is Main to follow the default structure in the MVVM Light template. As a note, I typically move the MainPage into the Views folder and make the adjustments to all of the wiring so that all of my views are in the place where I like them. Next step is to hook up that button we added earlier to send the *NavigateToPageMessage *when its clicked. If you have Blend, this portion is drag and drop, otherwise you’ll have to some cut and paste. Open the project in Blend, then open MainPage.xaml in the designer. Select the Assets Tab and click on the Behaviors in the left panel. You will see a selection called *EventToCommand; *click and drag this item to either the Button on the design surface OR the button in the Object and Timeline and release.
Then in the properties tab give the new EventToCommand the name “GoToPage2”, the EventName should already set to Click, if it is not change it.
Save your changes, and if you view the xaml now you should see the following code
<Button Content="Button" Height="72" HorizontalAlignment="Left" Margin="154,354,0,0" x:Name="button1" VerticalAlignment="Top" Width="160" >
    <i:Interaction.Triggers>
        <i:EventTrigger EventName="Click">
            <GalaSoft_MvvmLight_Command:EventToCommand x:Name="GoToPage2" Command="{Binding GoToSecondPageCommand, Mode=OneWay}"/>
        </i:EventTrigger>
    </i:Interaction.Triggers>
</Button>
Next step, back to Visual Studio to add the last bit of code to the MainViewModel. Add a new RelayCommand which is in the MvvmLight.Command namespace.
public RelayCommand GoToSecondPageCommand
{
    get;
    private set;
}
Then in the constructor in the “else” portion you need to instantiate the RelayCommand and add the handler to send the message. Add the following code
GoToSecondPageCommand = new RelayCommand(() =>
                {
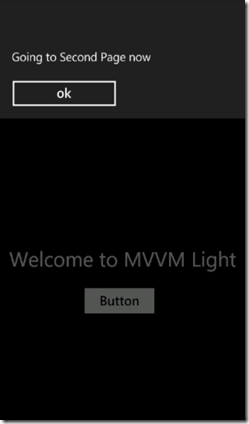
                    MessageBox.Show("Going to Second Page now");
                    Messenger.Default.Send<NavigateToPageMessage>(new NavigateToPageMessage() { PageName = "SecondPage" });
                });
One last step here is to tell the EventToCommand that we added in Blend that this is the command to execute when the Click event is fired. we do this by setting the Command property in the xaml to the following:
<Button Content="Button" Height="72" HorizontalAlignment="Left" Margin="154,354,0,0" x:Name="button1" VerticalAlignment="Top" Width="160" >
    <i:Interaction.Triggers>
        <i:EventTrigger EventName="Click">
            <GalaSoft_MvvmLight_Command:EventToCommand x:Name="GoToPage2" Command="{Binding GoToSecondPageCommand, Mode=OneWay}"/>
        </i:EventTrigger>
    </i:Interaction.Triggers>
</Button>
Save all and run
Click Ok and next page is presented.
Now go build some apps!
Download Code for Part 2 here


